
SoftwareCentral
Disables the language cultures in SoftwareCentral. SoftwareCentral will only be available in English if the language cultures are disabled.
Sets the default language SoftwareCentral is shown in when a user visits SoftwareCentral for the first time. Note that this setting does not work if the language cultures are disabled in the setting above.
You have the option to choose "Use browser language". This option will set SoftwareCentral to the same language as the browser.
Disable the notifications popping up in the lower right-hand corner.
The time that the notification popup will show when a new notification comes in.
The notification popup dimensions in pixels.
Enables the Deployment Monitor in the lower left corner of the interfaces. It will only be available for users with access to the Deployment Manager interface via their security role.
When enabled, all new deployments will open the Deployment Monitor. This requires that the Deployment Monitor is enabled.
This will hide the “Delete in AD” checkbox in the Delete Computer interfaces.
This will force SoftwareCentral to always remove a computer from the AD when it is deleted in SoftwareCentral.
This will hide variables in Import Computer which are locked in a computer template.
This will hide the computer template drop-down box in the Reinstall Single Computer interface.
Show a User State Migration checkbox in Reinstall Single Computer. If a user checks this checkbox, a variable will be added to the reinstalled computer called "LAB_USMT" with value "true" indicating to the task sequence that a user state migration should be performed.
Show a textbox in Reinstall Single Computer where users can enter a new name for the computer about to be reinstalled.
Note that renaming or deleting a computer can conflict with a user state migration.
If enabled, SoftwareCentral will suggest users to rename computers in Reinstall Single Computer, when selecting a Computer Template with another naming series than the target computer has.
Note that this setting only works if "Show Rename TextBox in Reinstall Single Computer" is enabled.
Shows a checkbox in Reinstall Single Computer that if checked deletes the computer in the SCCM and AD and then recreates it before the reinstallation.
If "Don't allow users to delete computers in the AD" is enabled, the computer will not be deleted in the AD.
This setting will not work out-of-the-box with User State Migration and renaming.
This setting may result in conflicting records because the deleted computer still exists and may report back to the SCCM.
Refresh Machine Policy can not be invoked when the existing computer is deleted from the SCCM, so the reinstallation will not start immediately.
Shows a checkbox in Reinstall Single Computer that if checked deletes the computer in the AD before the computer is reinstalled.
Allow users to lease software in Manage Software on a Single Resource. Leased software will automatically be uninstalled after a given period of time.
By default, software is leased in months.
This setting will change the period to be in days.
This setting allows users to see and run task sequences that are deployed as available to the selected device.
Users can only see task sequences which are assigned to their security role.
If enabled, users won't be able to see software assigned as available via a query rule.
This will hide the Schedule button in all interfaces, disabling users from scheduling deployments.
Will display the users display names instead of their usernames in the Client Manager.
When retiring an application, it will be immediately removed from all Software Groups in SoftwareCentral.
Enable this to show a USMT checkbox in Clone Single Computer. If the user decides to make a user state migration, SoftwareCentral will make a Computer Association between the source and target computer.
Note that your task sequence must be able to copy the user state from the source computer.
If enabled, users will not be able to deselect the clone only software checkbox in Clone single computer.
Enabled by default. If enabled, already assigned software will be deselected in the assigned software list when a computer template is selected.
Software from the computer template will be assigned.
If enabled, it is still possible to manually reselect software you do not which to remove.
If enabled, program names of programs deployed to the same collection will not be added to the status message, warning the user that these programs also will be uninstalled.
Reports / graphs for workstations in the Dashboard interface will display all devices in the following collection.
Reports / graphs for servers in the Dashboard interface will display all devices in the following collection.
Removes the option to rename folders and collections in Application Management and Package Management.
Shows a combobox in Import Computer where a user can select an existing computer and load all its settings from its machine variables.
Note that assigned software outside of Software Groups will not be added to the new computer.
Will show the comment from the advertisement on mouseover in the OS-drop-down selector.
Only software which is a member of the selected Package Security Groups can be cloned from any of the clone interfaces.
To allow cloning of all software, leave this field empty (default behavior).
In interfaces where the resource selector can be used, the collection filter in the window will only show assigned collections for security roles.
If you select a default Application Template, it will automatically be selected in the Application Wizard and users will start in the file selection step instead of in the template step.
Show devices mac-addresses in the Client Manager interface. Enabling this may impact performance of that interface.
Set the columns that will be selected by default when opening the Export Security Roles window.
Set the flags that will be pre-selected in the Replace Package interface,
The default behavior for Package Security Groups is that packages and applications, unassigned to any Package Security Group, will be available to all users.
Enabling this setting will hide all packages and applications, unassigned to any Package Security Group, for all users except administrators.
Enable this so users can’t uninstall software they don’t have permission to install.
If checked, computers are allowed to be deleted during computer imports. E.g.: If a user tries to import a computer that already exists, this setting will allow the user to delete the existing computer, if the users security role allows the user to do so.
This will show primary devices assigned by the user agents. If disabled, only administrator assigned primary devices will be shown.
When using machine variables there is a time zone variable. This can use a set of predefined time zones from the SoftwareCentral database. The SoftwareCentral time zones are not compatible for some remote regions in Windows 7 and above. Enable this setting to use the new time zone standards.
This will add an additional variable called “OperatedBy” to all computers imported through SoftwareCentral. The value of the variable is the user who imported the computer.
Note that HTA’s running in anonymous mode will write the username “service”.
This will add an additional variable called “OperatedBy” to all computers reinstalled through SoftwareCentral. The value of the variable is the user who reinstalled the computer.
This setting only applies to all single Reinstall actions, including: Reinstall Single Computer, Web Services, HTA reinstall, Edit Computer and Clone Single Computer. It does not apply to Reinstall Multiple Computers, Deployment Manager and Clone Multiple Computers
Adds all packages as machine variables with the Software Group application / package Base Variable Name. The device is then removed from the individual install collections. It is required that all packages and applications can be installed by a task sequence.
Packages and applications will then be installed by the "Install Software Group" step in your task sequences.
It only applies to packages and applications that are deployed with direct membership rules.
This will allow SoftwareCentral to use computer names that are missing in the sequence when using a Computer Naming Schema.
If you have a naming schema with a prefix "PC" and a 3 digit counter and the following computers: PC001, PC002, PC004.
If you enable this setting, then SoftwareCentral will use "PC003" as the next name. If you do not enable this setting, then SoftwareCnetral will use "PC005" as the next name.
When this setting is enabled, SoftwareCentral will use a "reserved name list" in the SoftwareCentral database. So if a user requests a new name, e.g. in Import Computer, but does not import the computer, then the requested name will be reserved for up to 48 hours.
If a user chooses to rename a computer during a reinstallation, the name will be reserved for 90 days or until the computer has been renamed (the Task Sequence has completed).
If enabled, web services will throw a SoapException if an error occurs.
The SoapExcetion will contain details about the error occurred.
Note that if you do not catch the exception in your own code, it may break your application / script.
The path to the logo used in the shop.
The logo dimensions must be 300 x 100 px.
We recommend that the background color is dark blue: #383D6C H: 166 S: 81 L: 82 R: 56 G: 61 B: 108
For local installation:
The logo must be located within the SoftwareCentral installation folder. The recommended path is \uploads\images\. This will preserve the image during updates of SoftwareCentral.
The path to this folder should be “../Uploads/Images/logo.png”.
Cloud:
The logo must be a URL, e.g.: https://softwarecentral.cloud/pictures/SoftwareCentral.PNG
Sets the title of the shop. This is displayed in top of the shop next to your logo.
From here you can customize the background color and the font color of the header (Shop Title)
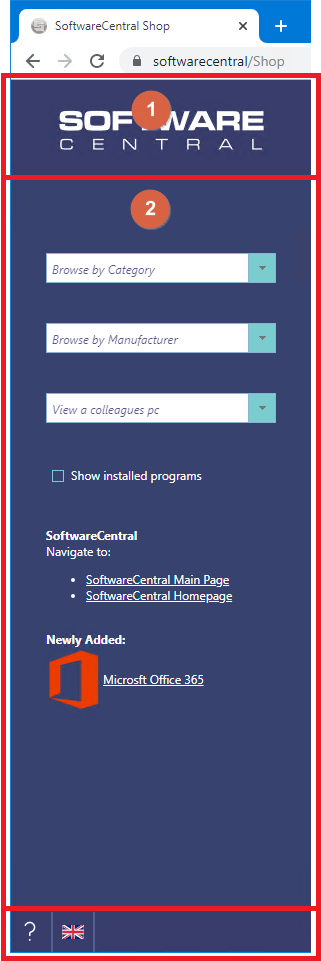
You can customize the colors of the left side menu in the shop.
1. You can change to logo to your own logo. Change the color of your image to change this fields background color.
2. Use the color picker named "Menu" to change the color of this field. Note that the text in this menu is white, so a very light color for the background will not work particular well
3. Use the color picker named "Footer menu" to change the color of this field. Note that the color of buttons are white, so a very light color for the background will not work particular well
Use this to change the color of the buttons in the shop. Note that when you change the color of the buttons, we "hover" effect will disappear.
When a user orders an application, the user will be added to the user install collection. If disabled, the device the user is currently using will be added to the device install collection.
Packages and Software Groups will still be installed for the device.
When a user orders a Intune application, the user will be added to the install group. The user must be the primary user of at least one Intune managed device to see Intune applications.
If disabled, the device the user is currently using will be added to the install group.
If enabled, co-managed devices will be able to see and order applications from both the Configuration Manager and Intune.
This setting will hide packages and software groups in the shop. It will also hide applications which are not deployed to a user collection.
Custom Shop Items will still be displayed.
By default, searches in the shop looks in both package names and descriptions. If this setting "Only search in item names" is enabled, searches will only look in the package names.
Show the Alphabetical Search bar below the standard search bar.

Display a combo box in the shop where users can choose between different sorting options. E.g. sort by name or sort by price.
Show the Product Category dropdown menu in the Shop.
Only the content of this Product Category will be shown in the shop when users load the shop.
The users must actively change the Product Category to see other items.
Leave this combo box empty to display all items the users are allowed to see.
Show the Manufacturer filter drop-down menu in the shop.
Show the colleague PC dropdown menu in the Shop.
Limit the available devices in the Colleague PC drop-down menu to this collection.
This can for instance be used to sort out servers in this drop-down menu.
Shows a button below the filters that clears all filters.
This will show a button next to the search field in the shop where users can see all software currently installed.
Show installed software in the bottom of the list.
Shows the more button which opens a new window with more information about the package. This only applies for the "Default View" and not "Gallery View" and "List View".
Use this setting to add a custom text to the left menu in the shop. Messages can be written in clear text or html code.
The size of the text field is the same size as the menu should be in the shop.
You can add custom links to other pages or use shop deep links to link to items directly in the shop.
See the Create Html Content chapter for information on how to create HTML content.
 |
Note that making the content in the left menu to big may cause the content to expand beyond the left menu. |
Will show the “My Account” button where users can see their order history.
If enabled, the My Account page will open in a build-in window in the shop. If disabled, My Account will open in a new browser tab.
This will show the help button in the shop.
Let users switch between standard, gallery and list view in the shop. If disabled, users can only see the view mode selected in the next setting.
The view mode selected when users open the shop.
If enabled, users can upload files to their orders in the shop.
Note that a share to store the attachments must be defined.
A share to store order attachments. This share is required if users must be able to upload files. Note that the app-pool user must have access to this share.
Change the text of the install / uninstall / rerun buttons in the shop. This button will open a new window, where you can also see a preview of your new text. Note that the length of the button is fixed, so you cannot make the text to long.

Set the check out message that is shown after a user has placed an order in the shop. The size of the window you can edit the check out message in is the same size as the check out box in the shop.
See the Create Html Content chapter for information on how to create HTML content.
|
Note that making the content in check out message to big may cause the content to expand beyond the borders of the check out page. |
Show a "Close Window" button on the check out page. Some browsers prevents a web application from closing a window.
If enabled, a window displaying the installation status will popup for the users after they have ordered an application from the shop.
For the best experience, you should also enable the setting "SCCM -> Clients -> Use live data in Manage Software".
|
The installation status monitor uses lots of system resources. If many users monitor software at the same time it may have an impact on the performance of SoftwareCentral. |
You can add your own message on the installation monitor. For instance with instructions on expected installation times and how to contact the service desk.
Prompt users if they are leaving the shop with items in their shopping basket.
The number of days before an approver will receive a reminder mail about orders pending his or hers approval.
The currency symbol used in the shop.
Show the 'Set Temporary Approver' option in the Approvers View interface.
The AD-Group holding the available approvers for the approval flows in Software Administration and Custom Shop Items.
Uses the global catalog instead of the defined domain controller. This will include users in AD-groups where the user is in another domain than the AD-group, but it will slow down searches.
Select approvers from a CSV file instead of an AD group.
|
This functionality is deprecated and should no longer be used. |
Use the SoftwareCentral Client when finding the computer name in the shop. See the guide “Use the shop without DNS lookup” for more information.
Activating this setting will override the standard name lookup, including the SoftwareCentral Client, and let users choose which computer they wish to shop for from a list of their primary devices.
If a user only has one primary device assigned, the user will not see the 'choose computer page.'
Enable 'Show user agents in user device affinity', under 'Variables' in the Settings interface, to include primary devices assigned by the user agent, otherwise only administrator assigned devices will be shown.
If enabled, Mac OS based devices will be redirected to the device chooser page. If the users only have one primary device, they will go directly to the shop.
This setting will overrule the "Computer name lookup" setting above for Mac OS devices.
If enabled, approvers will get an e-mail each time an order requiring their approval is send.
If disabled, approvers will only get one e-mail while there are orders pending their approval. When disabled, approvers will get a reminder e-mail.
Devices in this collection will not have access to the shop.
Packages in the shop can be in different life cycles. This is the translations of these life cycles.
Hide 'Available' deployments from the installed software list in the shop.
If a user is approved for an application one time, that user will be allowed to install the same application on multiple devices without additional approval.
Note that this setting will overrule approver conditions.
SoftwareCentral can send out mails using one of the following three methods, Microsoft Graph, Microsoft 365 or via a SMTP / relay server.
Use the combobox to select how you want to send out mails. Only one method can be active.
Once configured, you can use the "Send test mail" button to verify your settings. Note that this will save all changes made in the settings page.
When using Microsoft Graph, you must have configured at least one Intune tenant under General Settings -> Intune Configuration.
Note that sending mails using Microsoft Graph requires additional permissions as described under Intune Permissions.
Select if SoftwareCentral should use the users currently selected Intune tenant for sending mails or if you prefer that all mails are send from a specific Intune tenant.
Mails will always be sent from the Intune service account. That account must have an active mailbox.
If checked (default) then mails are send on behalf of the service account. This means that SoftwareCentral "signs on" as the service account and sends the mails.
If uncheched, SoftwareCentral uses its app-permissions to send the mail for the service account.
When using Microsoft 365, SoftwareCentral connects directly to a Microsoft server and sends mails as the provided Microsoft Account.
The hostname of the Microsoft 365 server. Typically smtp.office365.com
The server port is by default 587.
Use SSL when connection to Microsoft 365.
The Microsoft account username.
The Microsoft account password.
You can configure SoftwareCentral to use a local SMTP or relay server.
The fully qualified domain name of the server.
Tells whether or not SoftwareCentral needs to authenticate towards the mail server. SoftwareCentral authenticates as the application pool user.
The default sender address.
Custom Actions are scripts which are executed after a specific job in SoftwareCentral, e.g.: after a computer has been imported.
- A custom action must be enabled before it can be used.
- A path to the script is required. VBScripts and PowerShell scripts are supported.
- "Run as" is the user that will be used to execute the script. Users can be added with the Password Manager.
- The variables which will be parsed on to the script is listed.
Note that scripts are executed on the server hosting SoftwareCentral.