
Design HTA
To start designing the HTA, go to the Settings menu, then “Create HTA”, and the interface in figure 1 will appear. If you already have created a HTA, this will be populated in the middle of the interface.

It’s possible to import a premade HTA from an xml file, this must be a SoftwareCentral HTA xml file, and all custom variables in the HTA must exist in the system.
Note: When a new HTA is imported, the old one will be removed, it’s recommended to export the existing HTA, by clicking export in the bottom right corner.
SoftwareCentral has a standard HTA included. The standard HTA can be restored by pressing the "Restore" button. This will remove the current HTA.
The SoftwareCentral standard HTA can be seen in the screenshot below:
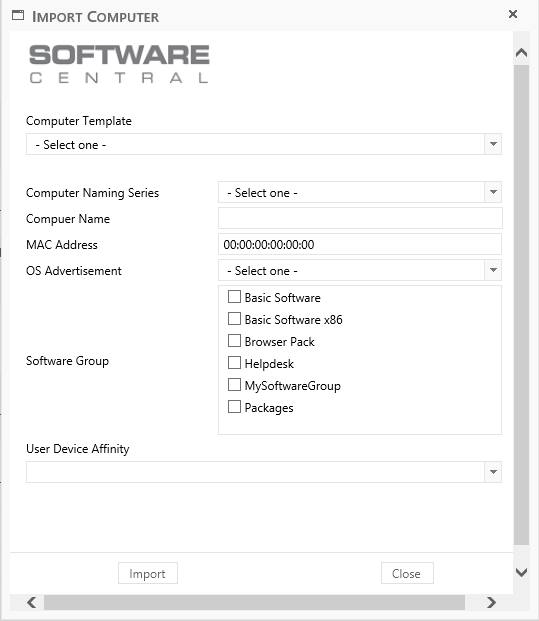
This HTA uses Windows authentication, mandatory and lock settings from computer templates.
Following setting can be used in the custom HTA, all these settings can be found in the right menu of interface as seen on figure 1.
Buttons
There are two none mandatory buttons that can be added to the HTA, beside the mandatory import button.
Close button, will close the HTA and cancel the import of the unknown computer. An import can’t be canceled, after the import button is pressed.
Login button will open a login window, where the windows user can be changed, this can be used for anonymous authenticated HTA’s, or if a user have login with a wrong user during the launch of the HTA.
Template
In SoftwareCentral computer templates, each machine/custom variable can be set to mandatory or locked; this can also be used in the HTA, where locked variable can be hidden, mandatory setting is used and a template with mandatory variables is used, a small red star will be seen beside the variable in the HTA.
Authentication
There is two ways the HTA can authenticate the user who is preforming the import, the first is by using the windows user, here SoftwareCentral gather all roles this user is a member off, and show all the templates and advertisements for theses roles. This is like the normal import known from SoftwareCentral.
If anonymous authentication is used, all previously run task sequence on the client will be shown, else the user must login to get the available settings.
Optional:
If anonymous authentication is used, a fixed user can be set in the user and password fields, the HTA will use this user to show available task sequences and templates.
Column size
This setting determine how big each column in the HTA will be, if single column HTA is used, this setting will not be used.
Preview size
This setting determines how big the HTA is going to be, these settings will also be transferred to the HTA script when the HTA is saved.
Following is a description of the different elements that can be added to the custom HTA, the elements can be found in the left menu of interface:
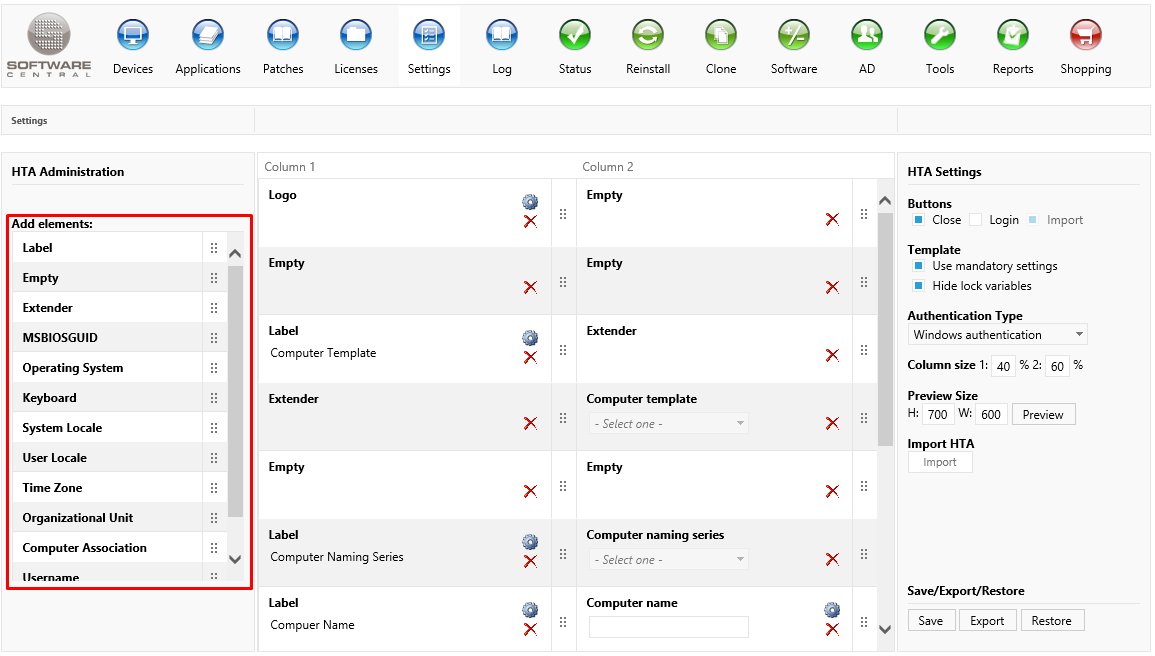
Simply drag an element in the drag column  to the position you want it.
· Label
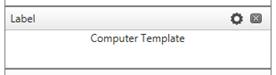 This element represents a label. When added to one of the two rows in the middle of the interface, a window will appear, where the text and tooltip is added.
Clicking the settings button, in the top right corner of the element as seen on figure 3, can at any time change a label element.
When a label element is added, a new will be created in the left menu.
· Empty
This element represents an empty field, and can be use to add empty space in the HTA.
When an empty element is added, a new will be created in the left menu.
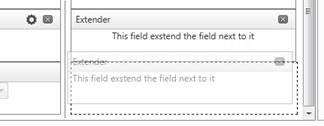
· Extender
This element represents an extender field, and when added the field next to it, will be extended to fill both the fields. An example of this can be seen in figure 2, where the computer template dropdown fill two fields.
When an extender element is added, a new will be created in the left menu.
· Logo
 This element represents a logo, the logo can at all time be changed in the SoftwareCentral settings menu, under the shop setting tab.
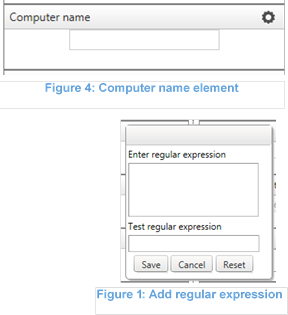
· Computer name
The computer name element has a special feature, where the entered name can be validated by a regular expression. This can be used if the needed naming convention is not supported by SoftwareCentral’s automatic computer naming.
The expression is added by clicking the settings wheel, as seen in the top right corner on figure 4.
This will open a new window as seen on figure 5, where the expression can be added, before saving the expression, it can be tested, by trying a valid an invalid computer name, in the textbox test field.
· Other
All other elements in the list are represent a computer variable or an element used in the import process.
NOTE:
There are three mandatory elements in the HTA.
· Computer name
· MAC address or SMBiosGuid
· OS advertisement
 The interface is a drag and drop interface, and the elements can be moved around.
Only elements in the two middle columns, is the elements that will be in the HTA. At anytime doing the creations of the HTA, the HTA can be previewed by clicking preview button in the right side of the menu as seen on figure 1. This will not save the HTA.
Dragging elements
When dragging an element around in the HTA, a doted line will be seen when an element can be dropped as seen on figure 6.
Removing elements
Following three element types can be removed by clicking the close button in top right corner of the element.
· Empty
· Label
· Extender
All other element is removed by being dragged back to left side of the menu.
Note: If an element needs to be in the bottom of HTA, and the interface isn’t scroll to the bottom, place the element in one of the columns, scroll down and slowly drag the element to its right place.
The HTA can be saved for backup as an XML file, and thereby be restored.
Clicking the export button in the bottom right corner as seen on figure 1 does this.
The created xml file can be found in the SoftwareCentral install directory, under /Uploads/HTA, the name of the file is “SoftwareCentralHTA.xml”
When every element is in place, press the save button in the bottom right corner at seen on figure 1, and wait for the process to finish.
Now go to install directory of SoftwareCentral, and under the folder /Uploads/HTA there will be an .hta file called “HTA_Dynamic.hta”.