

Use the new manual Intune Configuration.
The settings below no longer applies.
SoftwareCentral is compliant with Microsoft Intune® App Protection Policies and build on top of the Microsoft Graph API.
This guide describes how to configure SoftwareCentral to connect to Microsoft Intune.
SoftwareCentral connects to Microsoft Intune via the Microsoft Graph API. This is done by creating an App Registration in the Intune portal and linking this App Registration to your SoftwareCentral installation.
 |
If you have not configured SoftwareCentral to run with https, you must do this before you proceed. |
SoftwareCentral can authenticate in two different ways.
SoftwareCentral accesses Intune as an application. Users of SoftwareCentral gets direct access to Intune and their accounts do not need access to Intune. Note that you are responsible for having Intune licenses for your users.
You can grant users access to Intune interfaces and delegate resources with the SoftwareCentral Security Roles and Package Security Groups.
 |
This authentication type is no longer supported. We advise you to use "Authenticate as application". |
Users of SoftwareCentral must sign in with their Microsoft Account in SoftwareCentral to access devices and applications from Intune.
SoftwareCentral gets access to Intune on behalf of the signed in user, meaning that SoftwareCentral itself does not have access to Intune.
You can grant users access to Intune interfaces with the SoftwareCentral Security Roles, but access to the resources are managed from the Intune portal.
Note that when using Authenticate as user, not all functions in SoftwareCentral are available.
Your SoftwareCentral installation needs to authenticate against Intune. To do this a SSL certificate is required.
You can create a self-signed certificate directly from SoftwareCentral or acquire your own certificate from your preferred certificate authority.
You will need a .pfx file with the certificate and the private key.
You will also need a .cer file with the certificate and only the public key, not the private key.
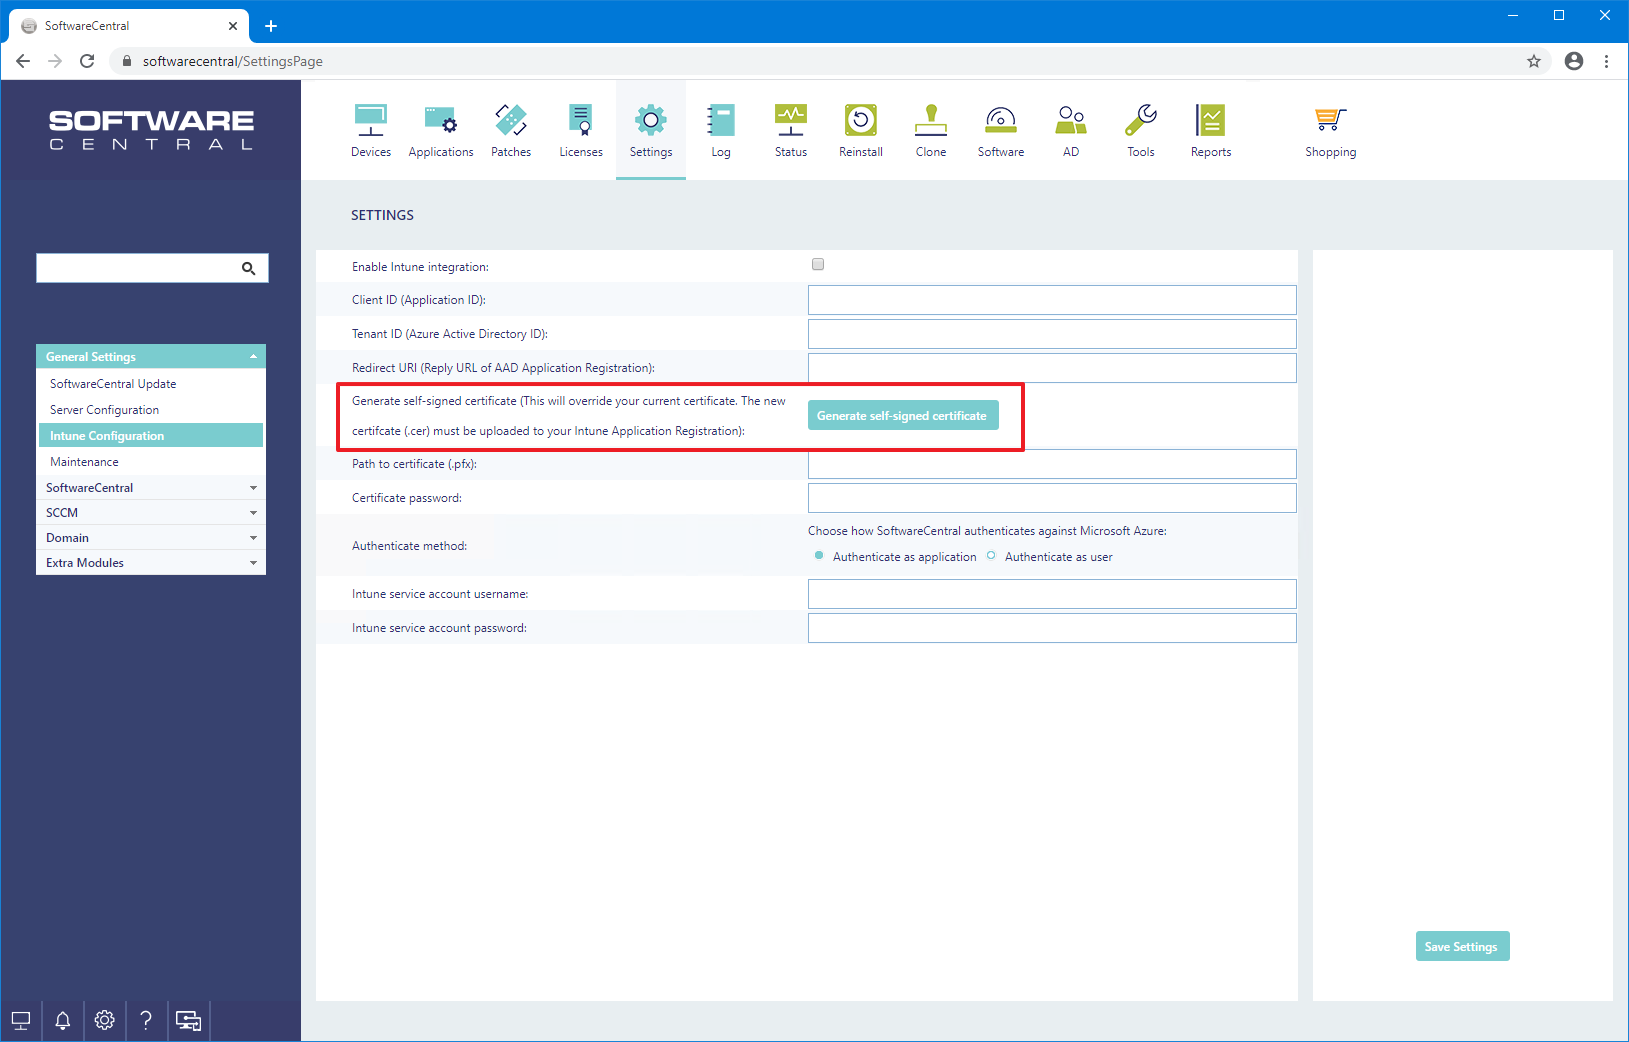
SoftwareCentral can create a self-signed certificate from Settings -> Settings -> General Settings -> Intune Configuration -> Generate self-signed certificate.
When you click on the "Generate self-signed certificate", you will be prompted for a password. Enter a strong password for the certificate and save this password.
A certificate file named "UploadToIntune_SoftwareCentral.cer" will be downloaded. This is the certificate you upload to Intune later in this guide. The certificate itself with the private key is stored in the SoftwareCentral installation folder under "Uploads\Certifcates\StoreLocally_SoftwareCentral.pfx".
Once you have downloaded the certificate file, click on the "Save Settings" button, to save the certificate path and password.
You need to setup an Azure Active Directory Application Registration in your Azure Portal to allow SoftwareCentral to connect to your Intune.
 |
Intune is in constant development, so the screenshots from Intune may be different from the ones you see in your portal. But the concepts are the same. |
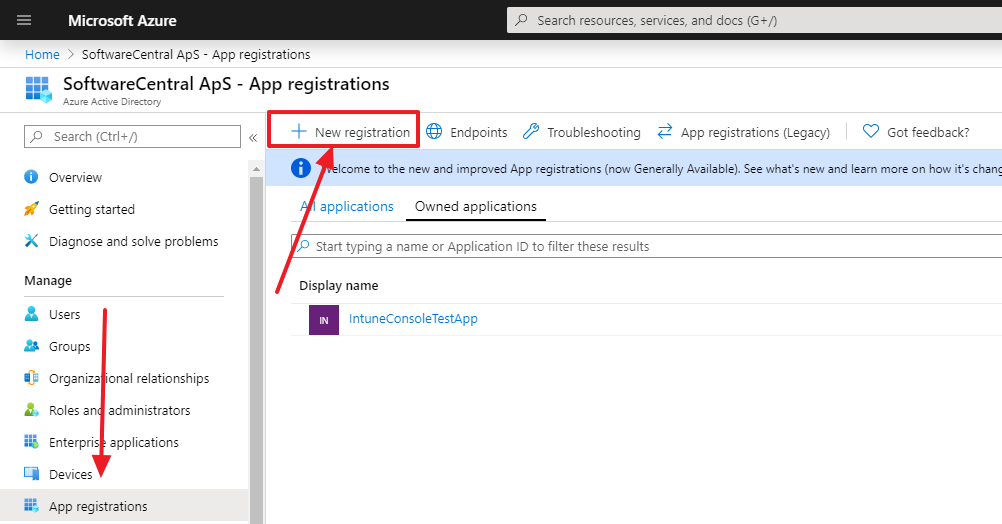
Go to the Azure Portal -> Azure Active Directory -> App registrations -> New registration:
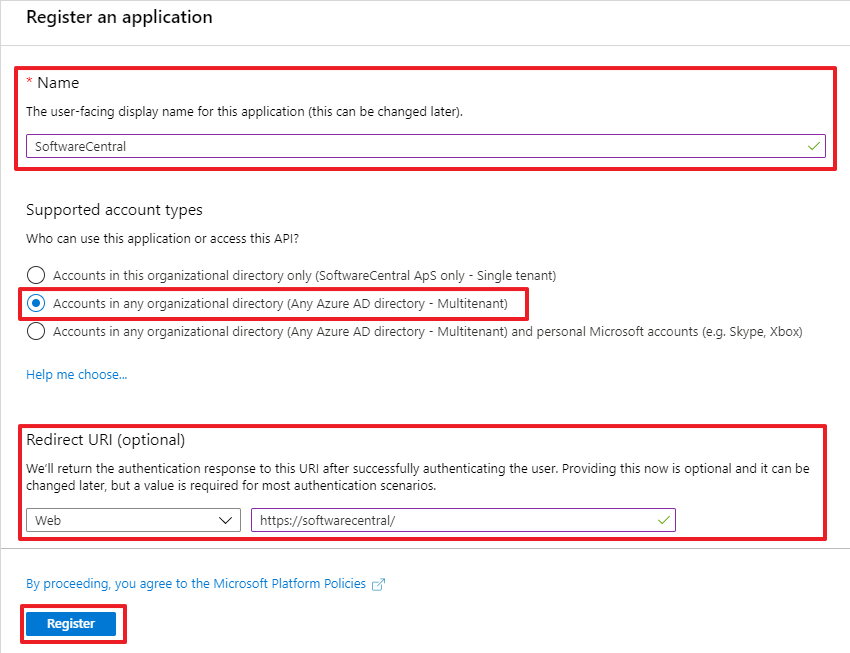
Give your Application Registration a name.
Under Supported account types, select Multitenant.
Under Redirect URI, enter the address you use to access SoftwareCentral.
Click "Register" to save:
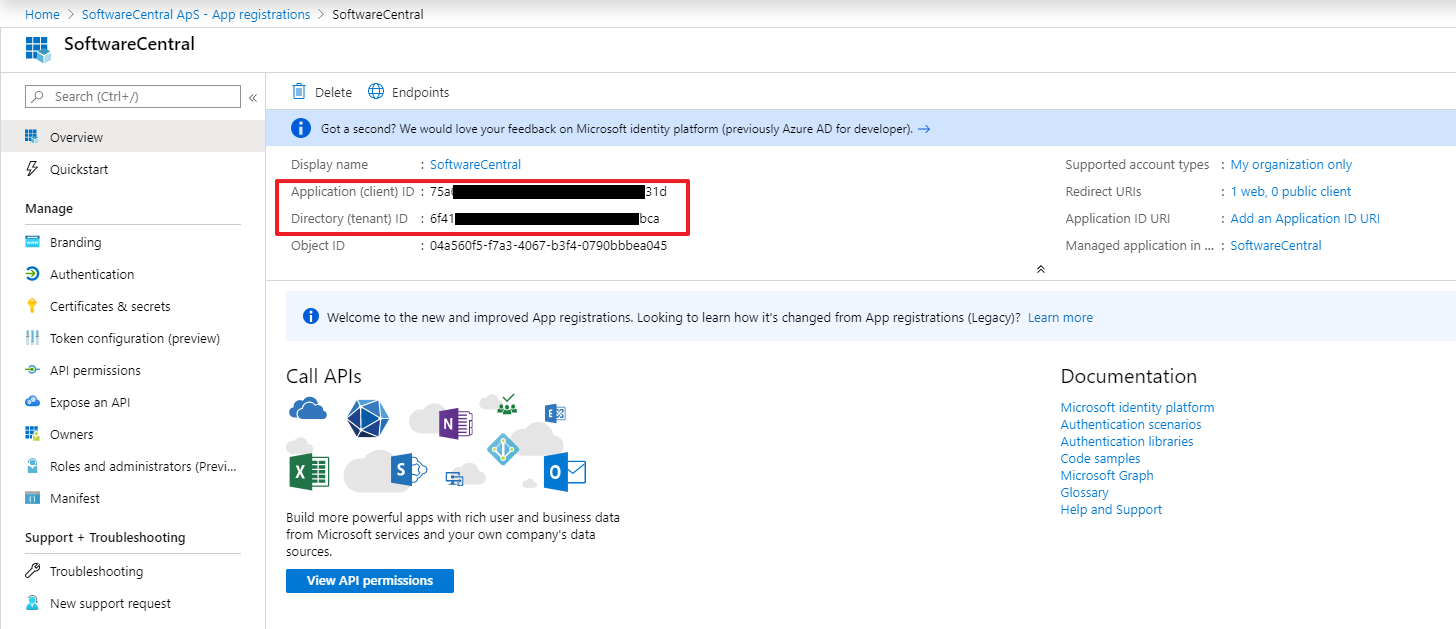
The Application Registration will now be created and opened. On the overview page, note the Application and Directory ID. They will be needed later during the setup.
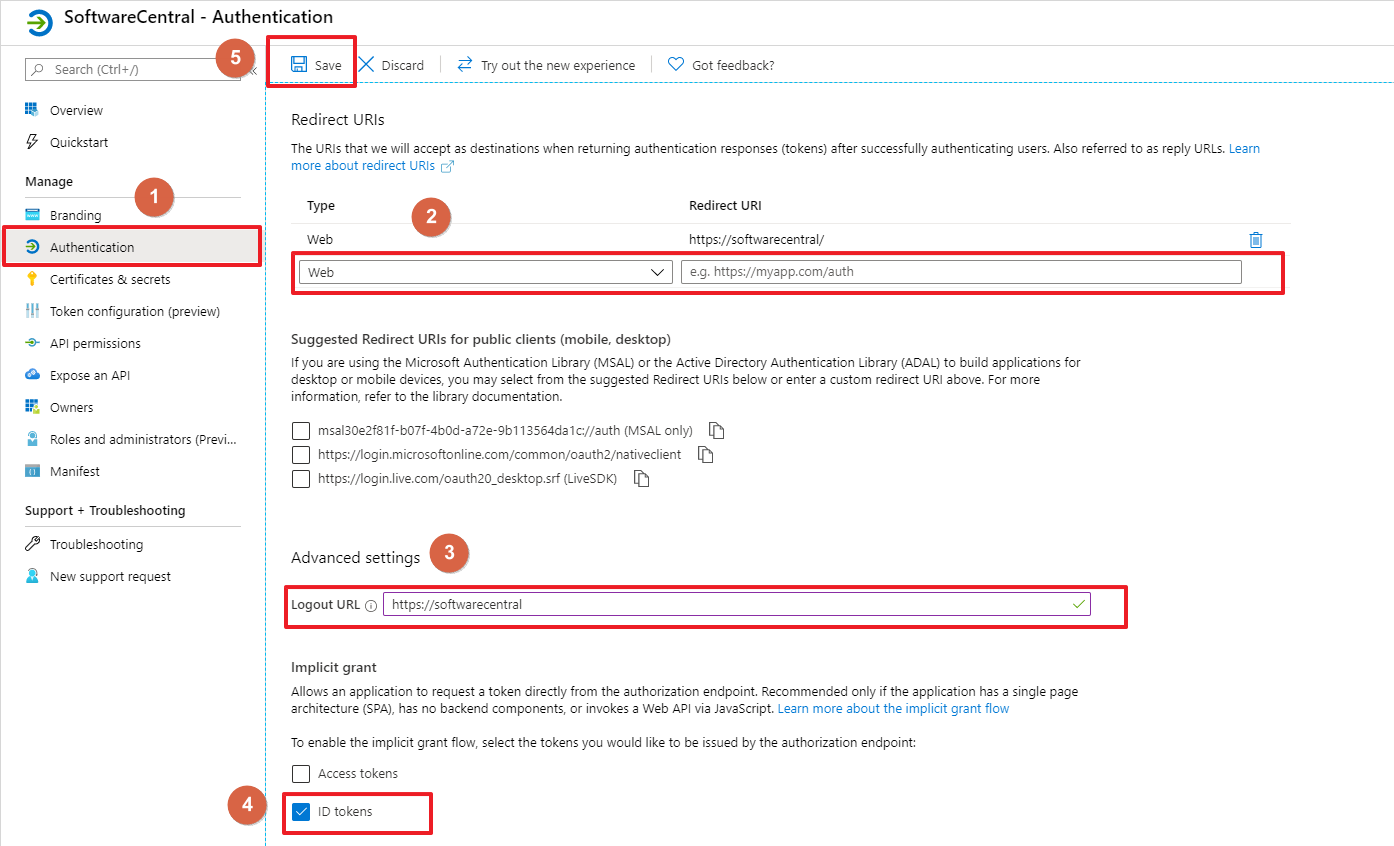
Go to the Authentication (1) tab.
If you have additional SoftwareCentral installations, which will use the same app registration in Azure, with different redirect URI's, you can add them under Redirect URIs (2).
Add your first Redirect URI in the Logout URL (3).
Under Implicit grant, check "ID tokens" (4).
Click Save (5).
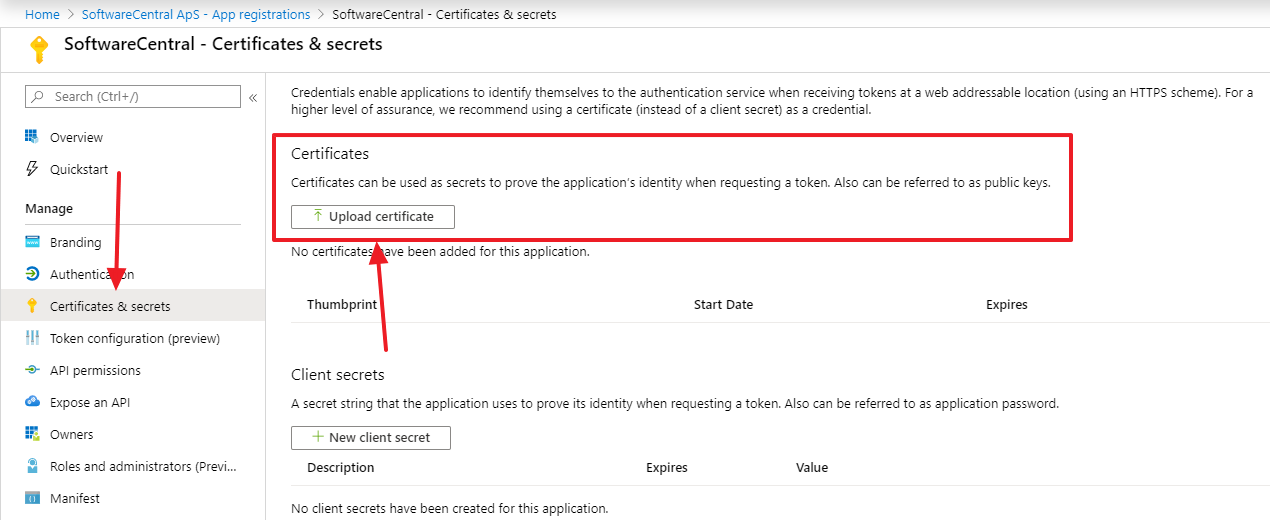
Next you must go to "Certificates and secrets" and upload the .cer file:
If you have generated the certificate through SoftwareCentral, then this is the certificate file named "UploadToIntune_SoftwareCentral.cer" that you downloaded earlier from SoftwareCentral.
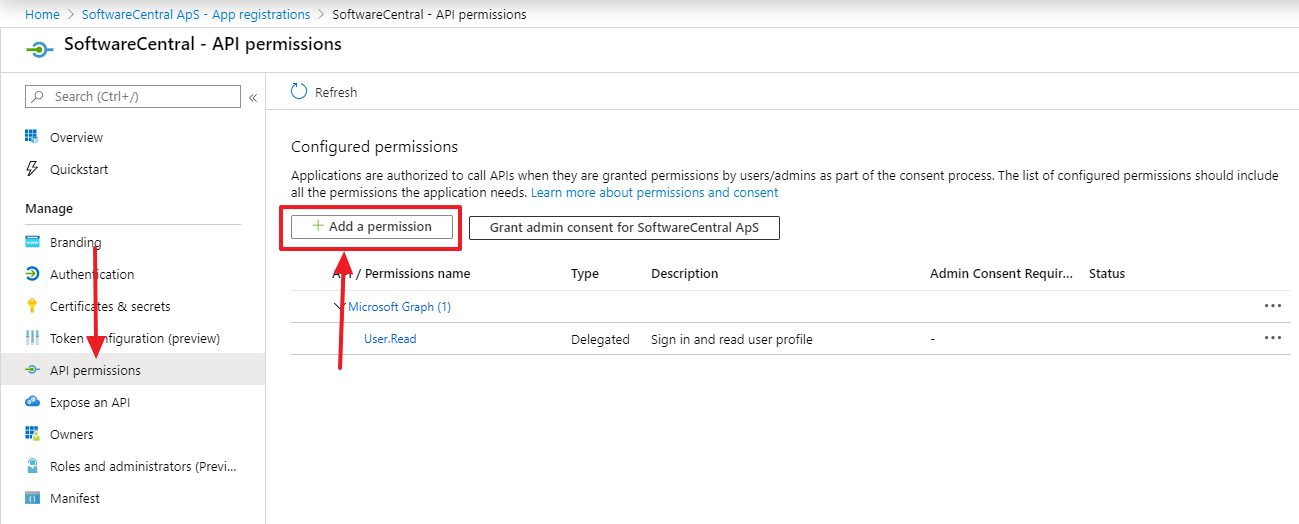
You must now grant permissions for the application. Go to "API permissions" and click on "Add a permission":
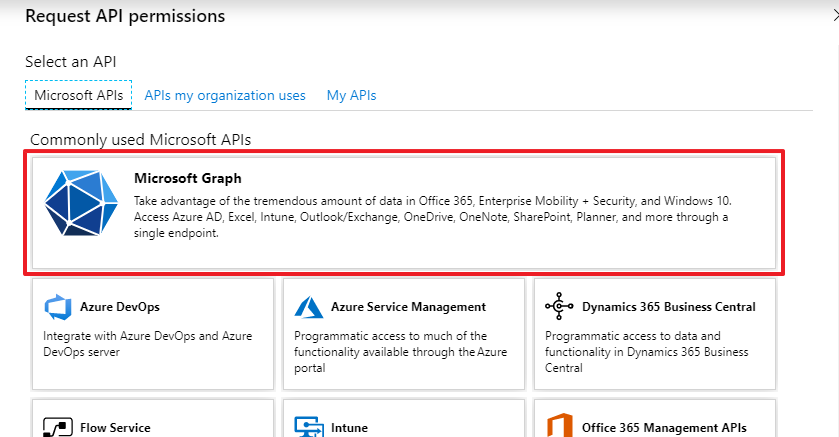
Select "Microsoft Graph":
SoftwareCentrals can call Intune as an application and on behalf of a user.
If you authenticate as a user, you only need to select delegated permissions.
If you choose to authenticate as an application, you need both delegated and application permissions.
For a complete list of required permissions, click here.

Select the required permissions and click on "Add permissions".
Note that the permissions email, offline_access, openid and profile are required to sign in.
 |
The screenshot below is just an example. You must assign all the required permissions from the Intune Permissions page. |
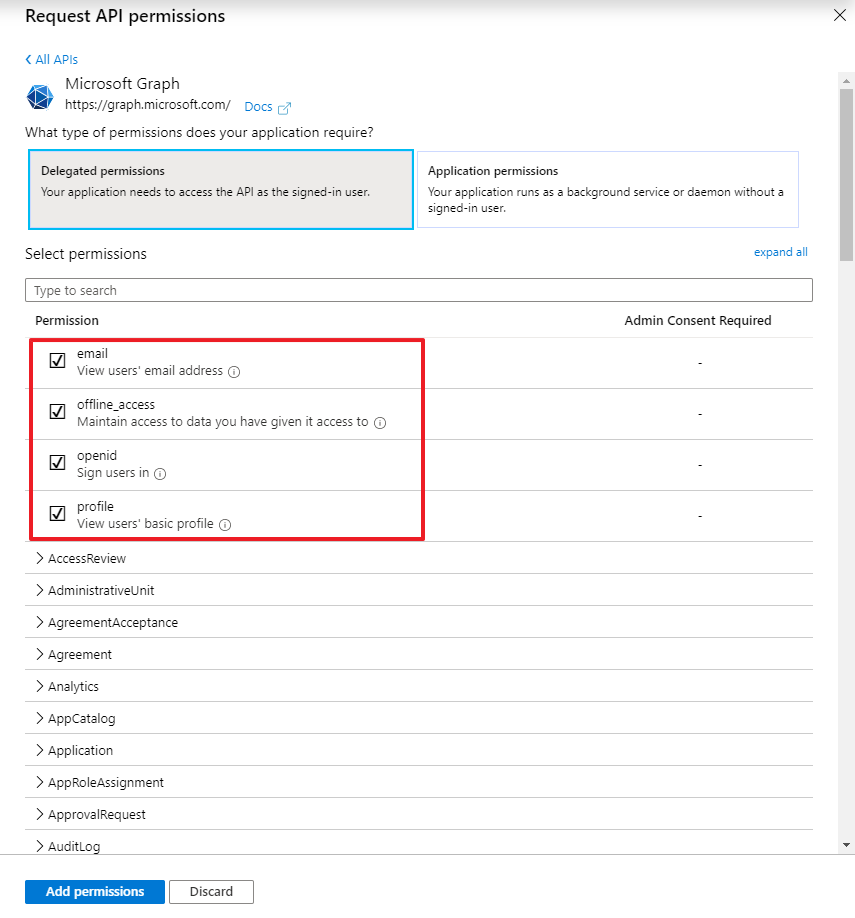
When the permissions have been added, you must wait until they are ready for consent:

It is required to grant admin consent for the newly added permissions. You must do this every time you change the permissions. Click on the "Grant admin consent for ...." button or get an administrator with the required permissions to log into the Azure Portal and grant the consent.
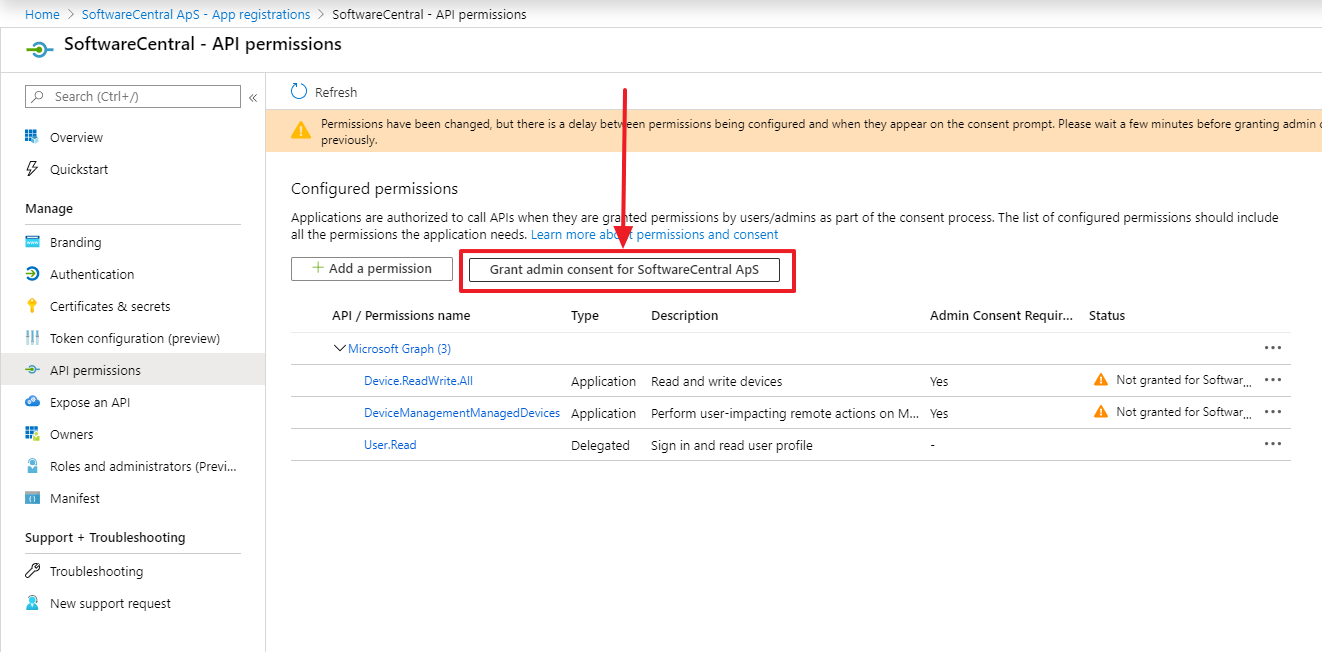
When you grant admin consent, a login prompt will open. Login with an administrator account. Then verify the permissions and click "Accept":
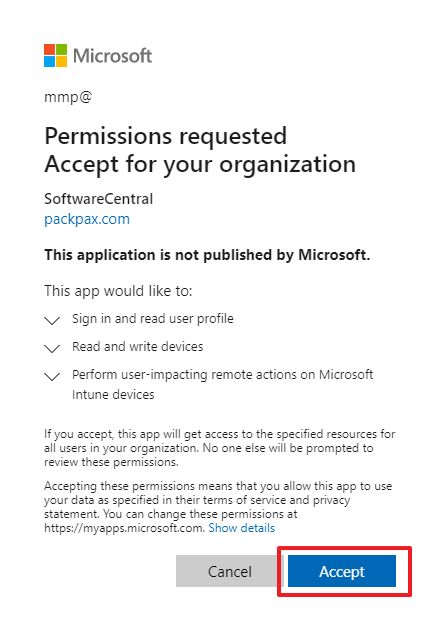
After the consent has been given, wait a few minutes before you continue.
 |
If you use "Authenticate as user", your users must also be granted access to their resources in Intune. If you use "Authenticate as application", the service account must be granted access to the resources you wish to manage through SoftwareCentral. |
Now you must go to the SoftwareCentral console. Open Settings -> Settings -> Intune Configuration:
1. Check the "Enable Intune integration" checkbox at the top.
2. Enter you Client (Application) ID.
3. Enter your Tenant (Directory) ID.
4. Enter your Redirect URI.
5. Enter the path to your certificate pfx file with the private key. Note that the SoftwareCentral service account (App pool user) must have read and access to this directory.
6. Enter the password for your certificate pfx file. The password is saved encrypted in the SoftwareCentral database.
7. Choose how SoftwareCentral authenticates against Intune.
Authenticate as application: Here SoftwareCentral will always be connected to Intune. Authentication is handled by the application (SoftwareCentral) and users do not have to sign in. Devices and applications are delegated via the Security Roles in SoftwareCentral. Note that when you authenticate as an application, SoftwareCentral needs a service account to retrieve data which is not available to applications. This includes Bitlocker recovery keys, which is only availabe to users who owns the requested device or to administrators. See the Intune Permissions page for the requried roles of the service account.
Authenticate as user: Here each user must sign in to Intune. If you use single sign on, users can access Intune resources directly. Otherwise users will have to sign in with their Microsoft account. Devices and applications are delegated to your users through the Intune portal. Note that applications must also be delegated with SoftwareCentrals Package Security Groups.
Click on the "Save Settings" button.
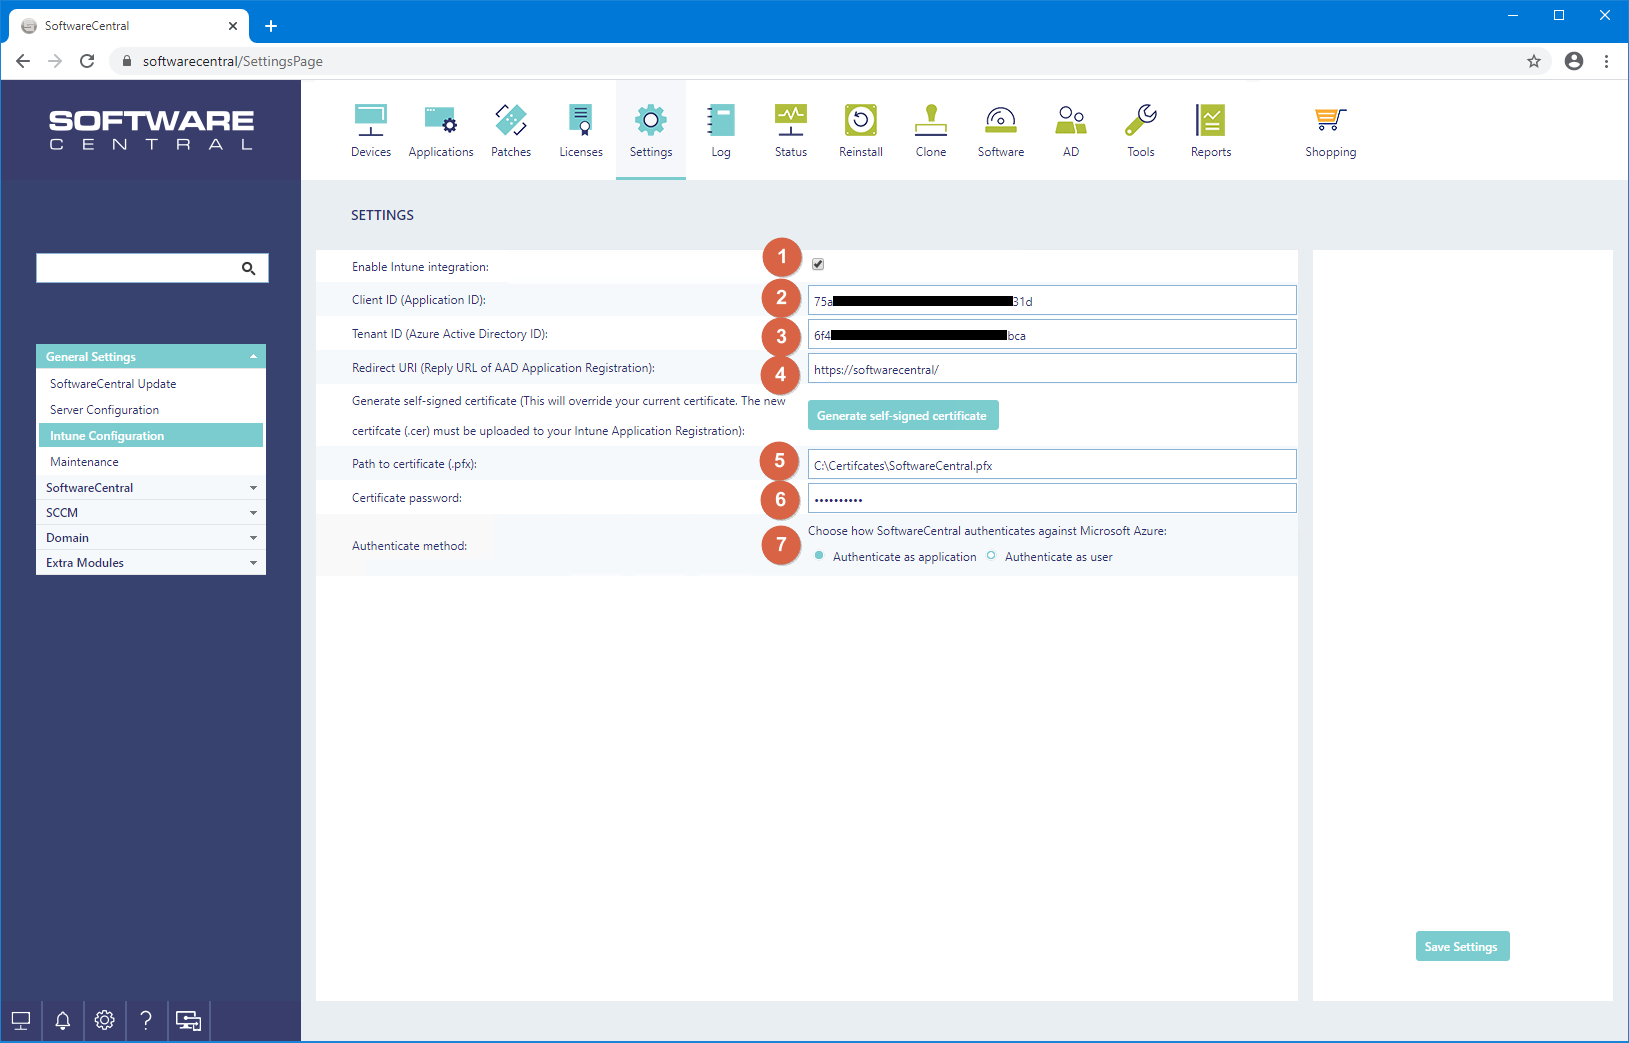
Your users are now ready to sign in to SoftwareCentral to manage Intune resources.
If you use "Authenticate as user", your users will now see an additional button in the lower left menu on all pages in SoftwareCentral:

When a user clicks on that button, the user will be redirect to https://login.microsoftonline.com/.
When the users have signed in with their work account, they will be redirected back to SoftwareCentral.
From there they will now be able to manage those Intune resources they have permission to see and manage.
If you use "Authenticate as application", you can now delegate devices to your users for each security role.