
Configure SoftwareCentral for the first time
When you configure SoftwareCentral for the first time, you must do it from the localhost site. This is a security measure to ensure that remote connections cannot change any critical settings for SoftwareCentral.
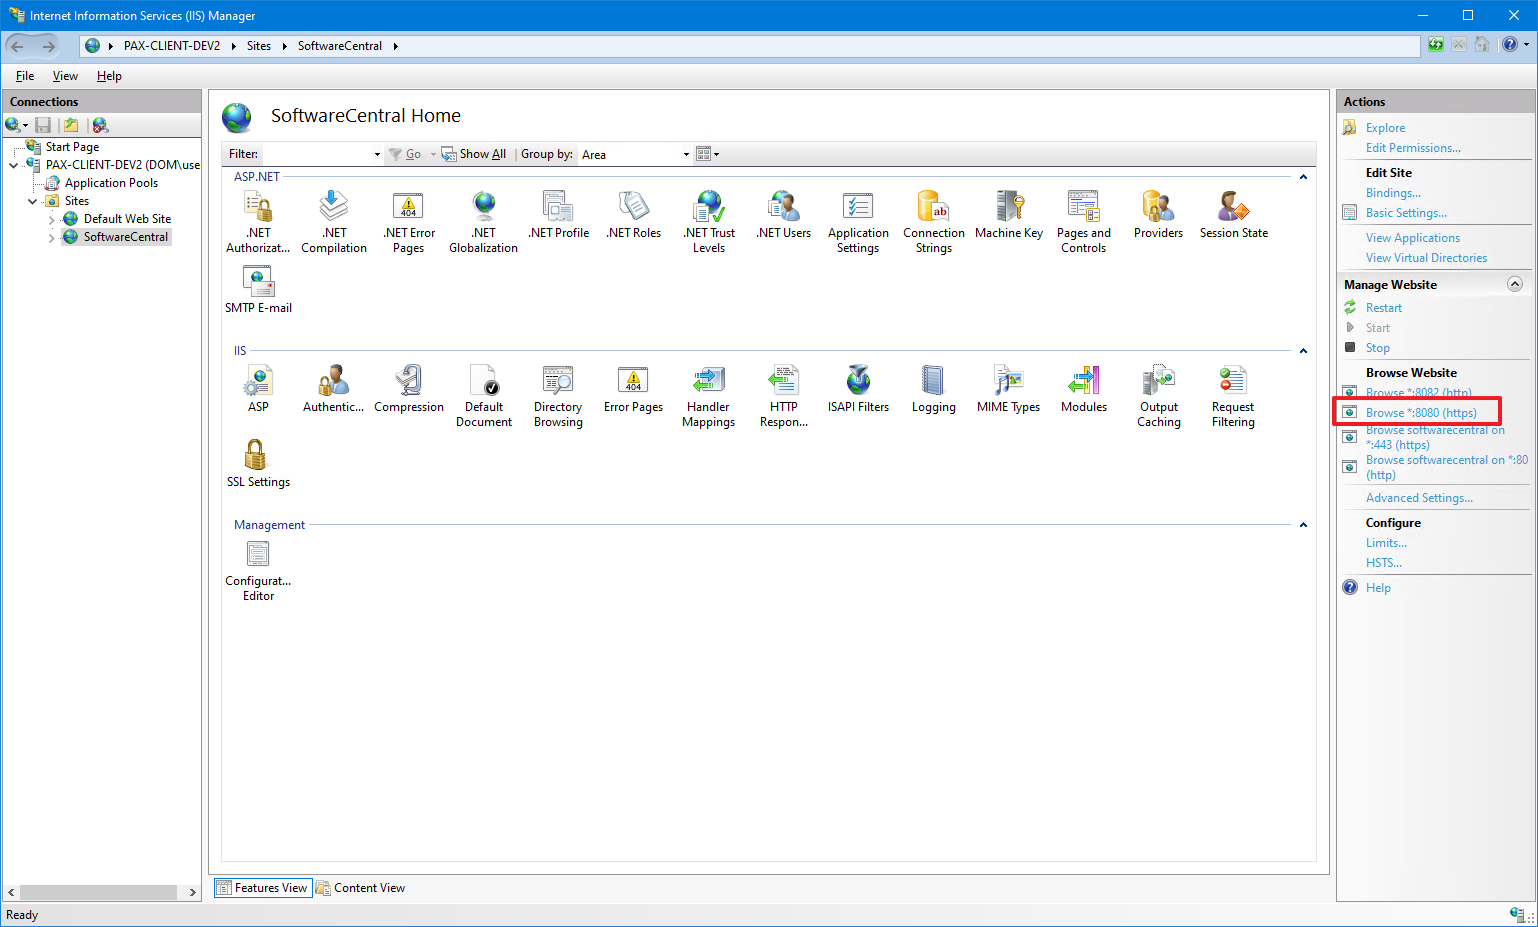
Go to the Microsoft Internet Information Services (IIS) Manager. Locate the SoftwareCentral site and click on Browse *:8080 (https).
 |
It is not recommended to use Internet Explorer, but if you are using Internet Explorer, make sure to disable Enhanced Security on the web server before you configure SoftwareCentral. |
SoftwareCentral will now launch in your browser. Depending on your type of authentication, you may be prompted to sign on.
If you are using Azure OpenID, you may be prompted to accept sign in on behalf of your organization. Accept that.
|
Some steps may appear in your installation if the required data is already available. |
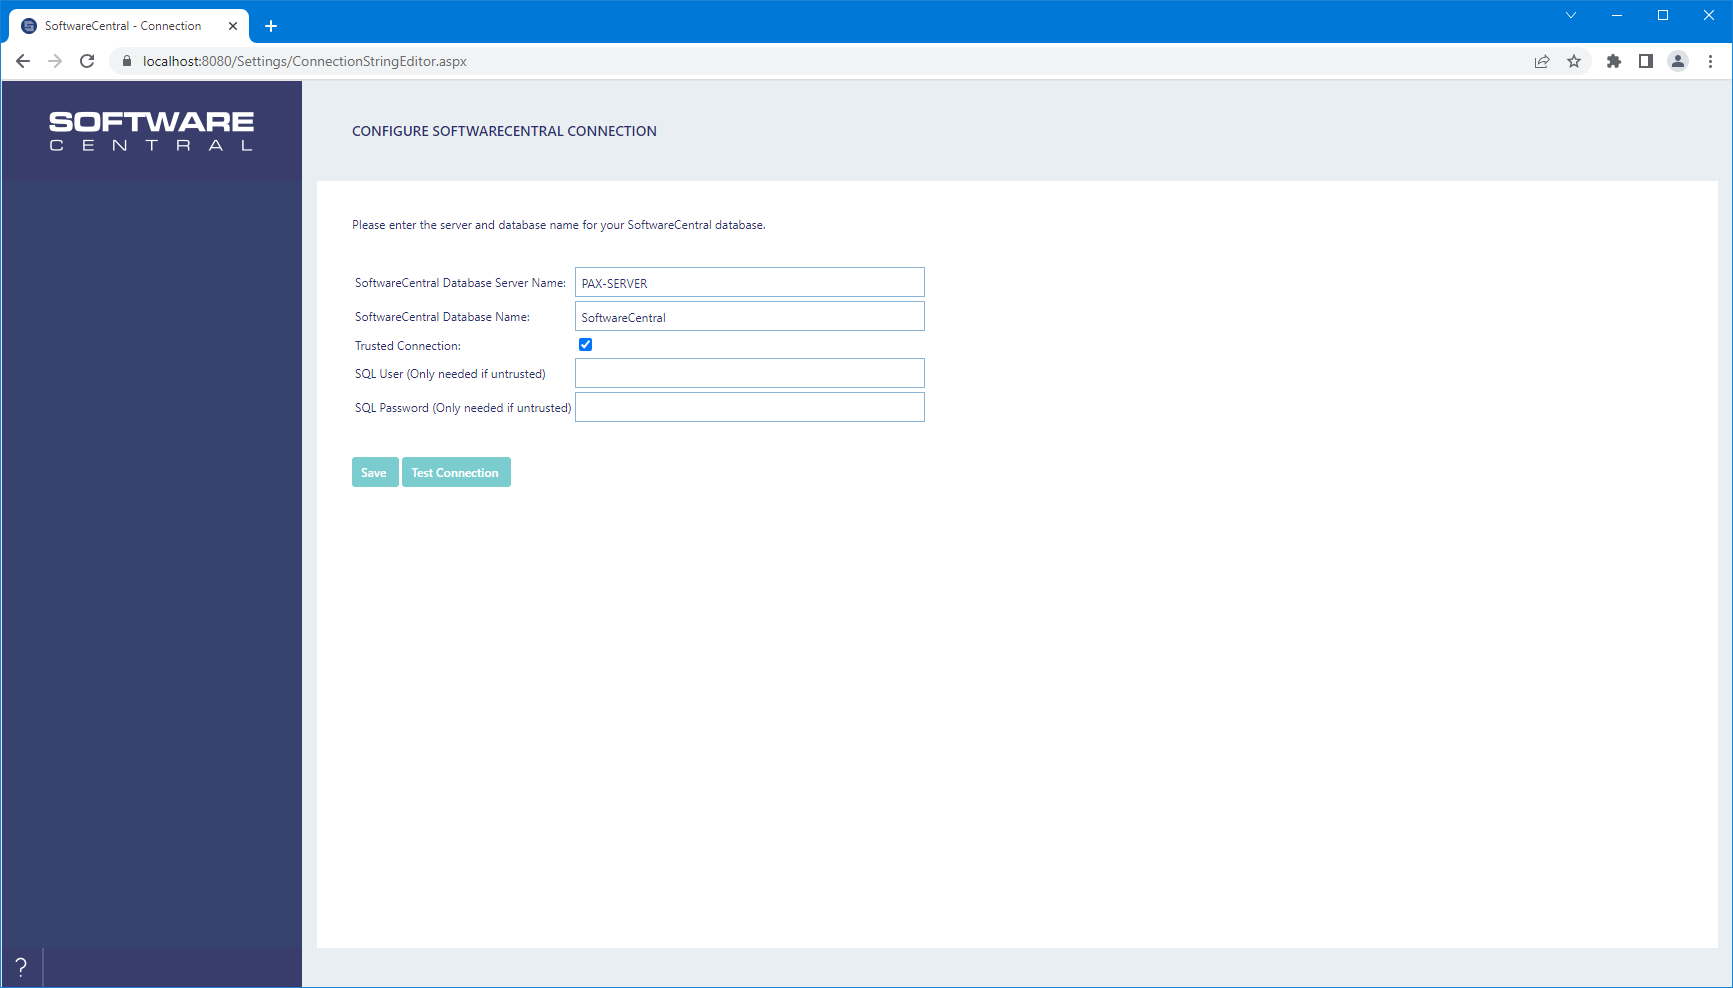
The first screen you will see is the database connection screen. It will already have your database information.
Test the connection to verify that the SoftwareCentral web site can connect to the database.
Once successful, save the configuration and proceed to the next step.
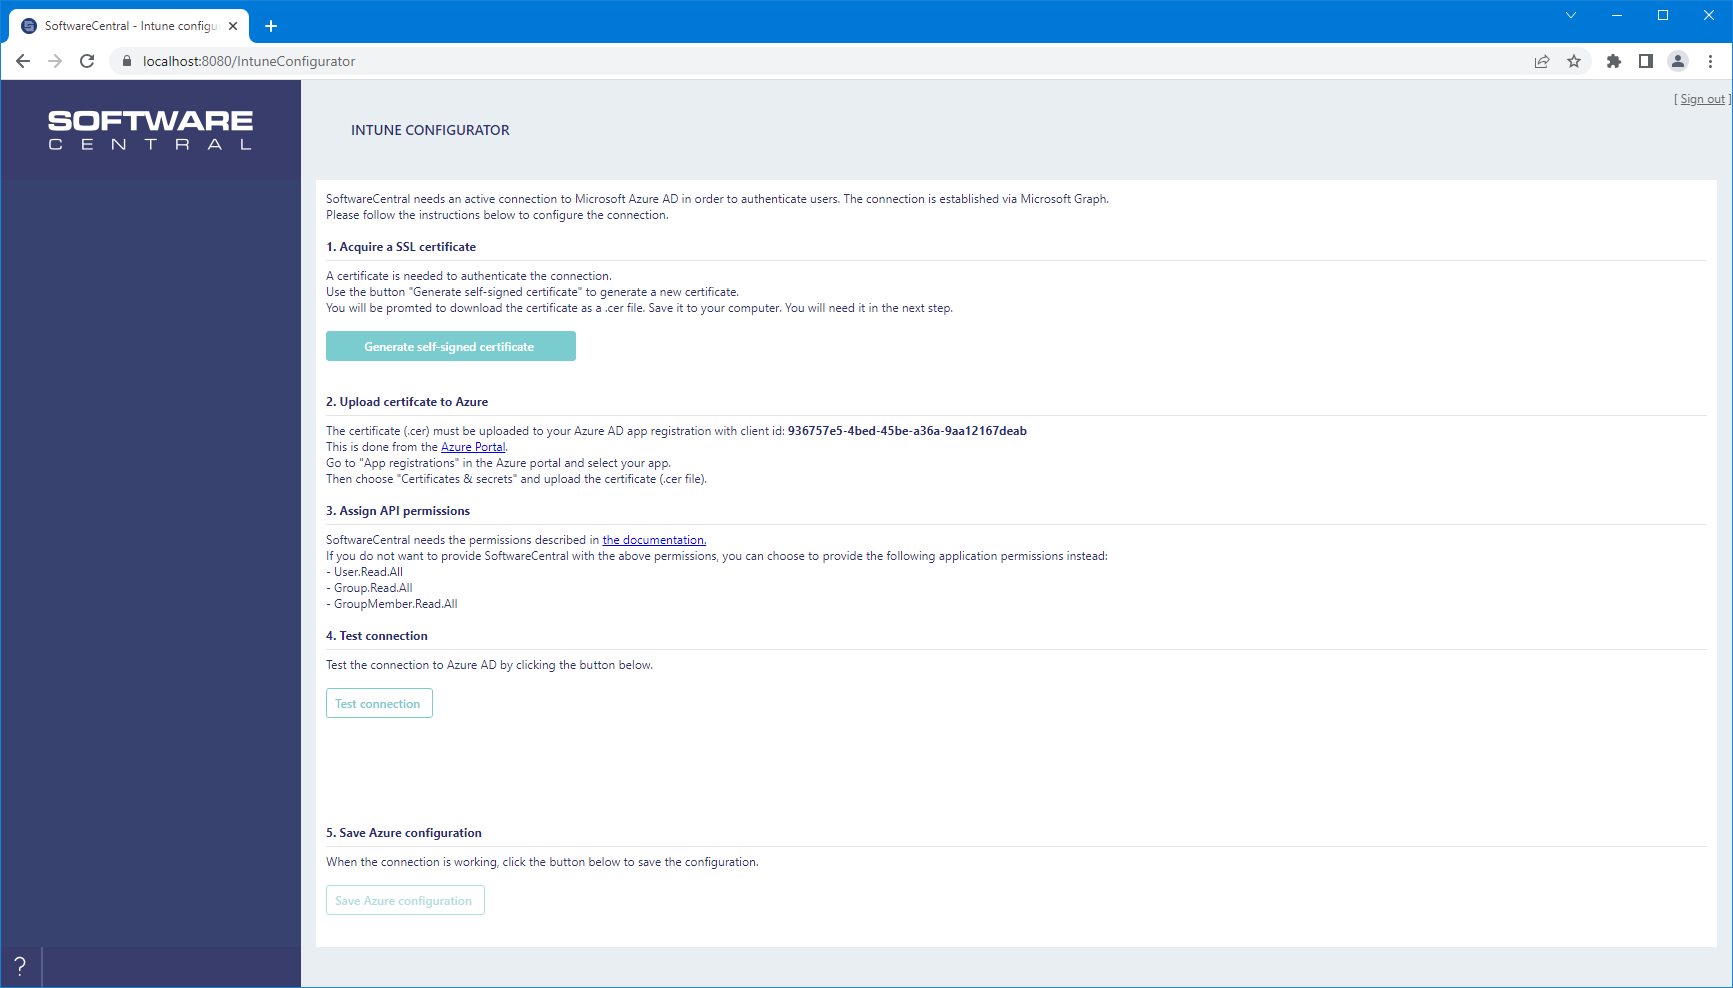
If you have chosen the Intune only option, but did not configure the Intune settings during the installation, you will now come to the Intune configurator. If you do not see this screen, you may proceed to the next step in this guide.
 |
You can add additional Intune tenants later from the settings menu. |
Generate a new certificate and upload the certificate to the Azure app registration. Follow the description and links in the interface.
Assign the required permissions to the app registration and test the connection.
|
Note that it may take a few minutes before the newly assigned permissions in Intune take effect. If the test fails, wait a couple of minutes before trying again. |
Once successful, click "Save Azure configuration" and proceed to the next step.
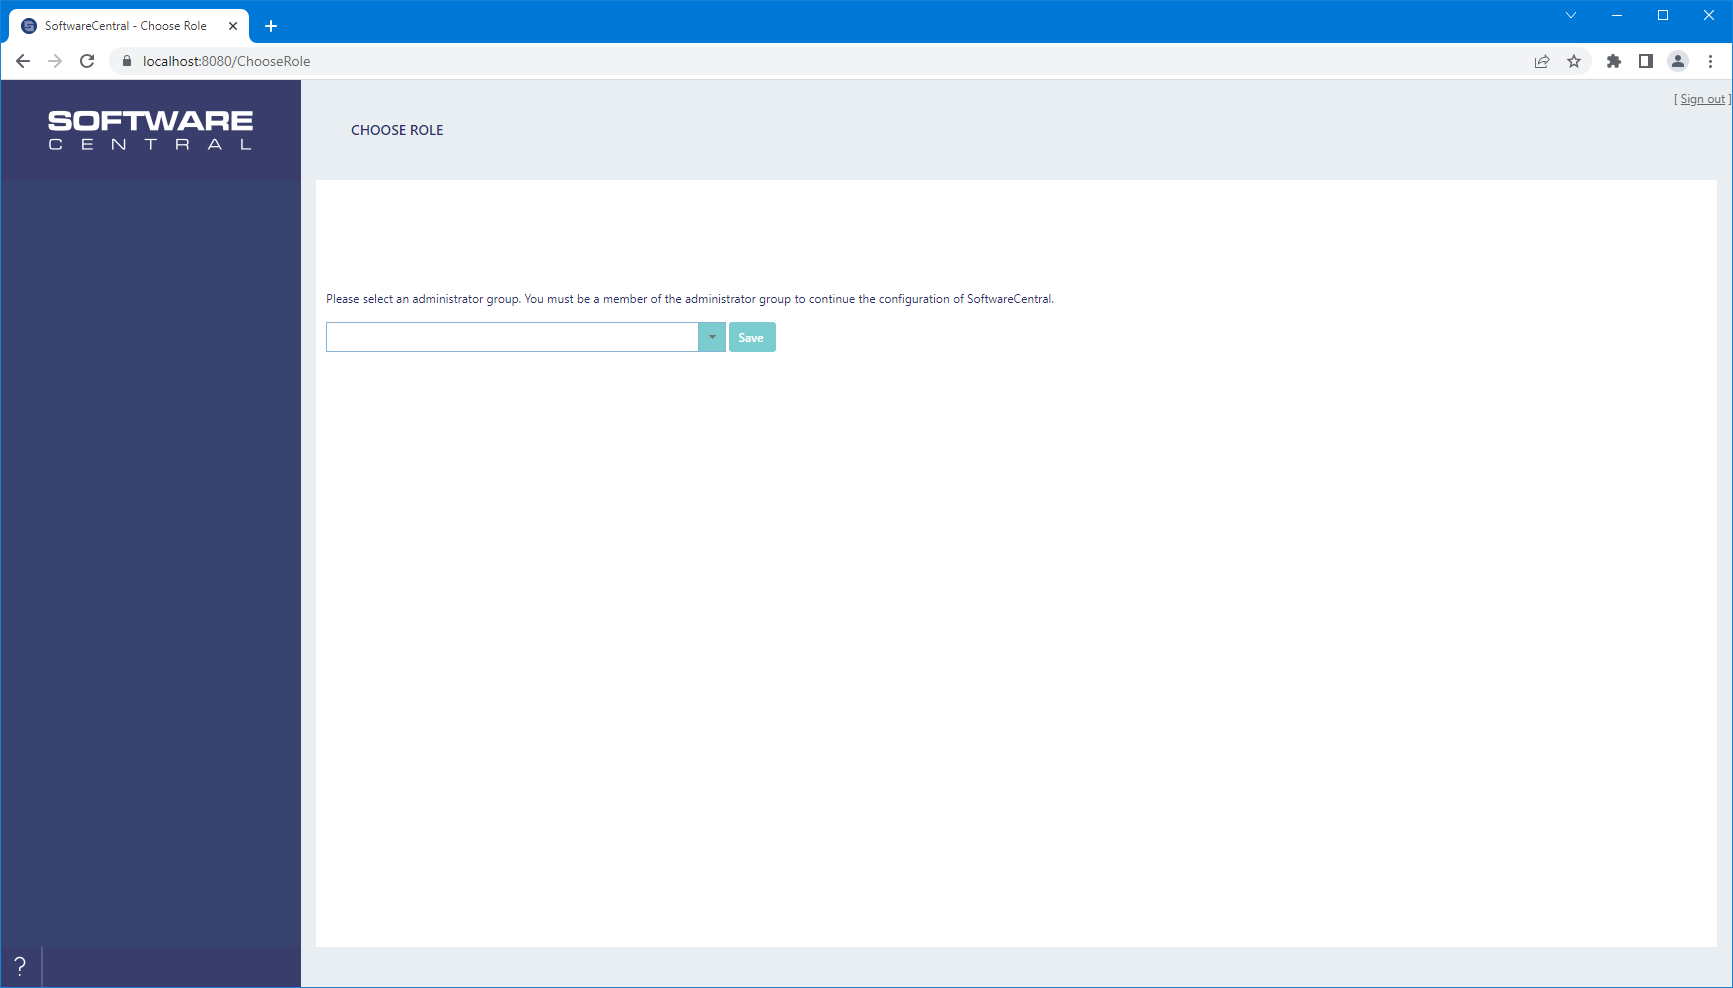
Next you must choose and administrator group. You must be a member of this group. If you are using Entra ID, you will also see an option to create an administrator group. You will automatically be added to the administrator group when it is created in SoftwareCentral.
|
This only applies to on-premises Active Directories: If you have just created the group and / or just added yourself to this group, it may take some time before the changes take effect. If you are using an on-premise Active Directory, it may help to restart the server. The SoftwareCentral configuration will start where you left if you restart the server. Just launch the IIS manager and browse the local https binding again. |
Select the group and click "Save".
In this step, you must enter the license for SoftwareCentral. If your installation has access to the internet, you must enter the user name and password provided by your retailer.
The "Installation Title" is used to identify your installations, if you have multiple installations of SoftwareCentral.
If your installation is offline, you will see an installation key. You must send this key to your retailer, that will then return your offline license key.
You cannot proceed without a valid license.

You will now be redirected to the SoftwareCentral main interface and configuration menu. Note that the interface and available / required fields will vary depending on your configuration.
If any required settings are missing, you will see them highlighted with a red text.
For a ConfigMgr environment, you will need to enter some server details like reporting server, package share(s) etc. The required settings will be highlighted in the interface.
|
For ConfigMgr environments you must also go to Settings -> SCCM Folders and Collections and configure all root folders and collections. |
Intune only installations should only have to fill in the following setting:
Application Base URL - The standard base URL to SoftwareCentral. This could for instance be https://softwarecentral/

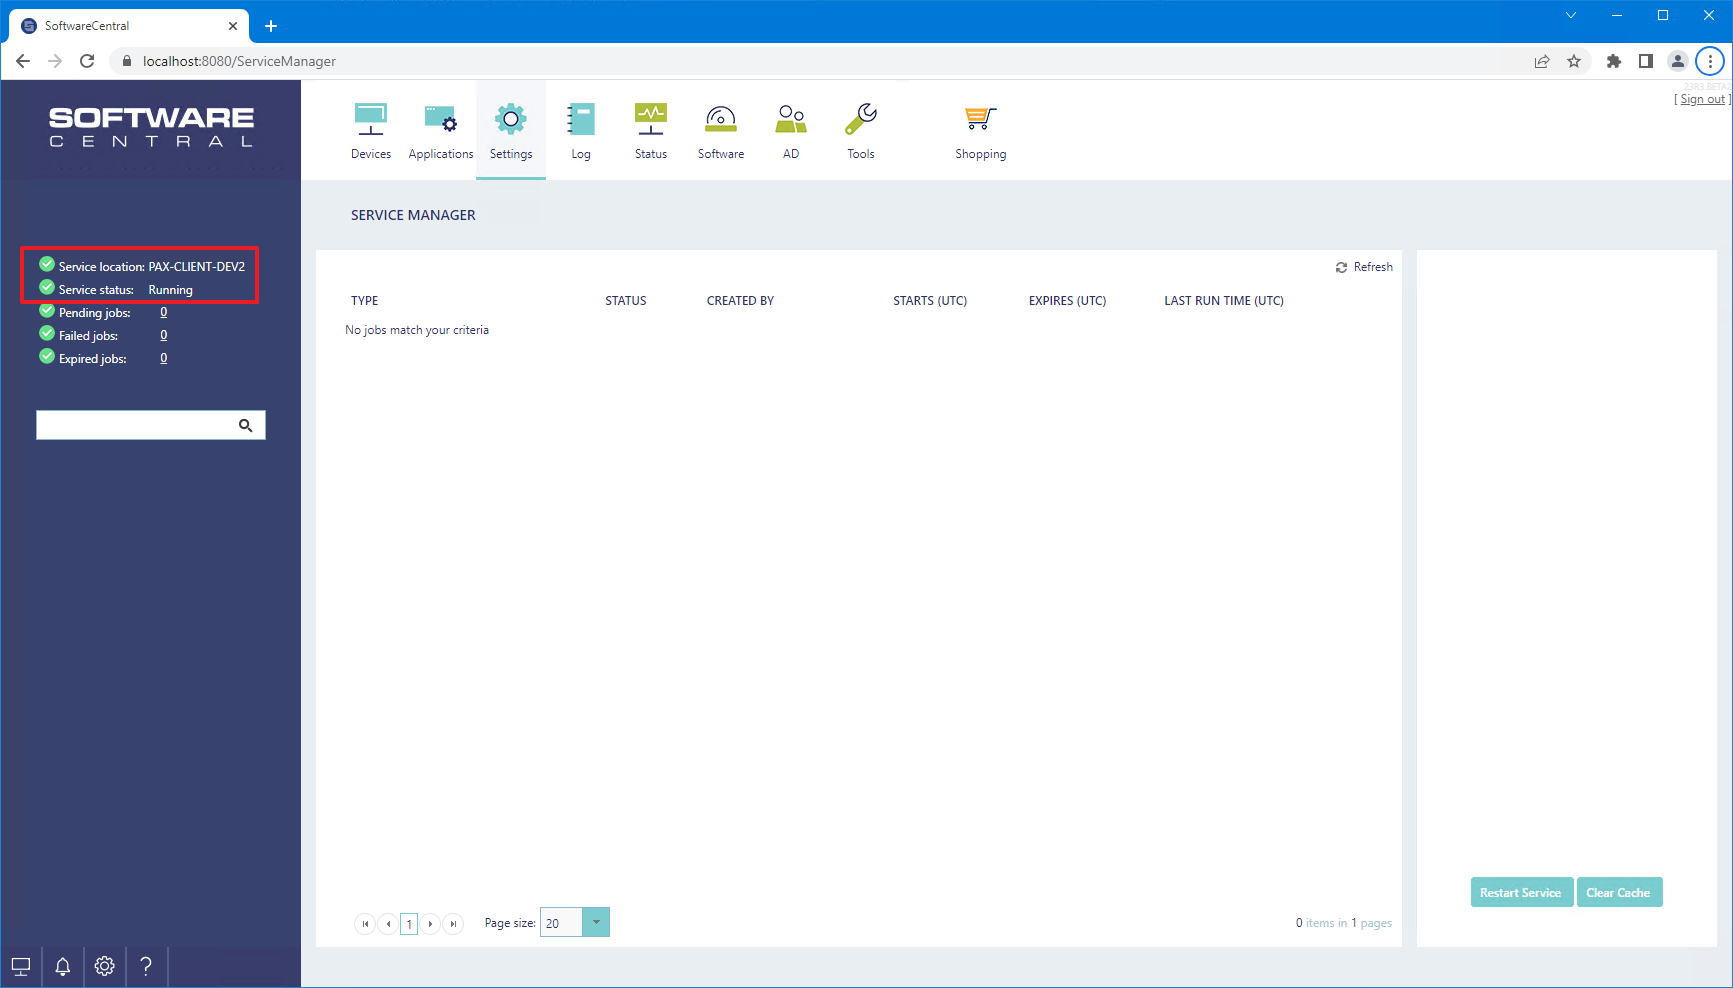
SoftwareCentral uses a Windows service to process long running tasks and schedules. This service is automatically installed during the configuration of SoftwareCentral.
To verify that it is installed, go to "Settings -> Service Manager".
Confirm that the service is running. If it is not running, go to the Log in SoftwareCentral. There will be one or more error messages stating why the service is not running and information on how to resolve the issues.
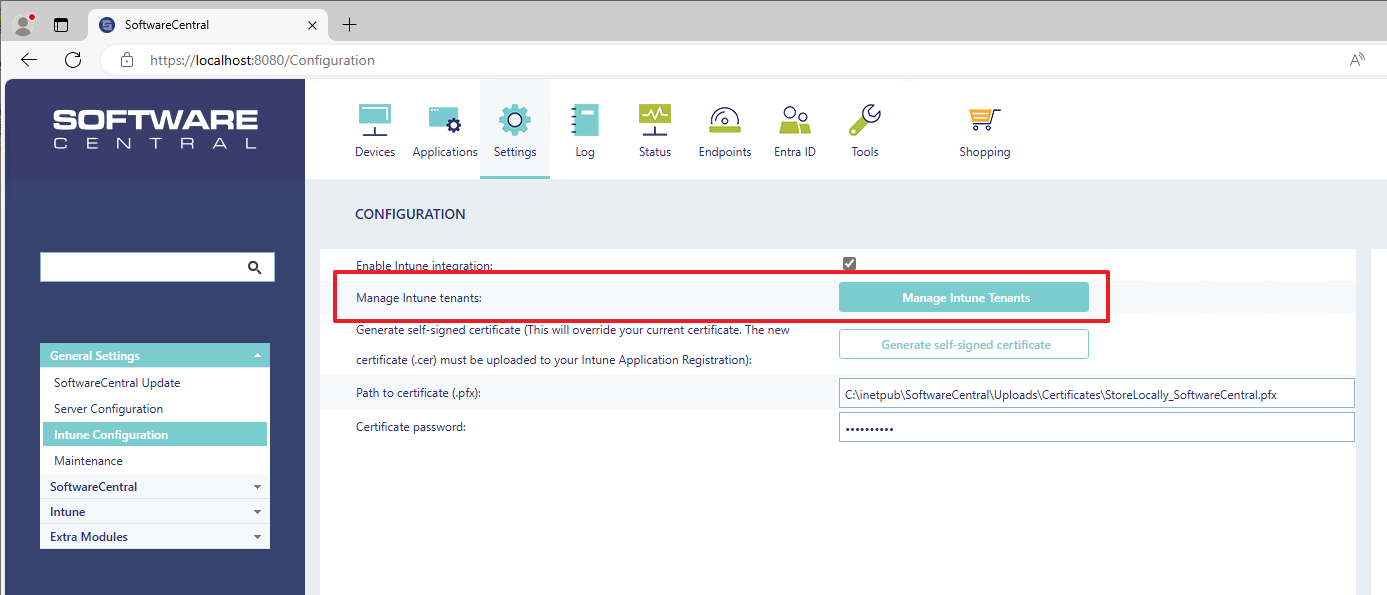
Some Intune features requires a service account. This includes reading BitLocker keys and resetting user passwords. For a complete list, see the Intune Permissions section.
You can add the service account in SoftwareCentral under Settings/Configuration -> Intune Configuration -> Manage Intune Tenants
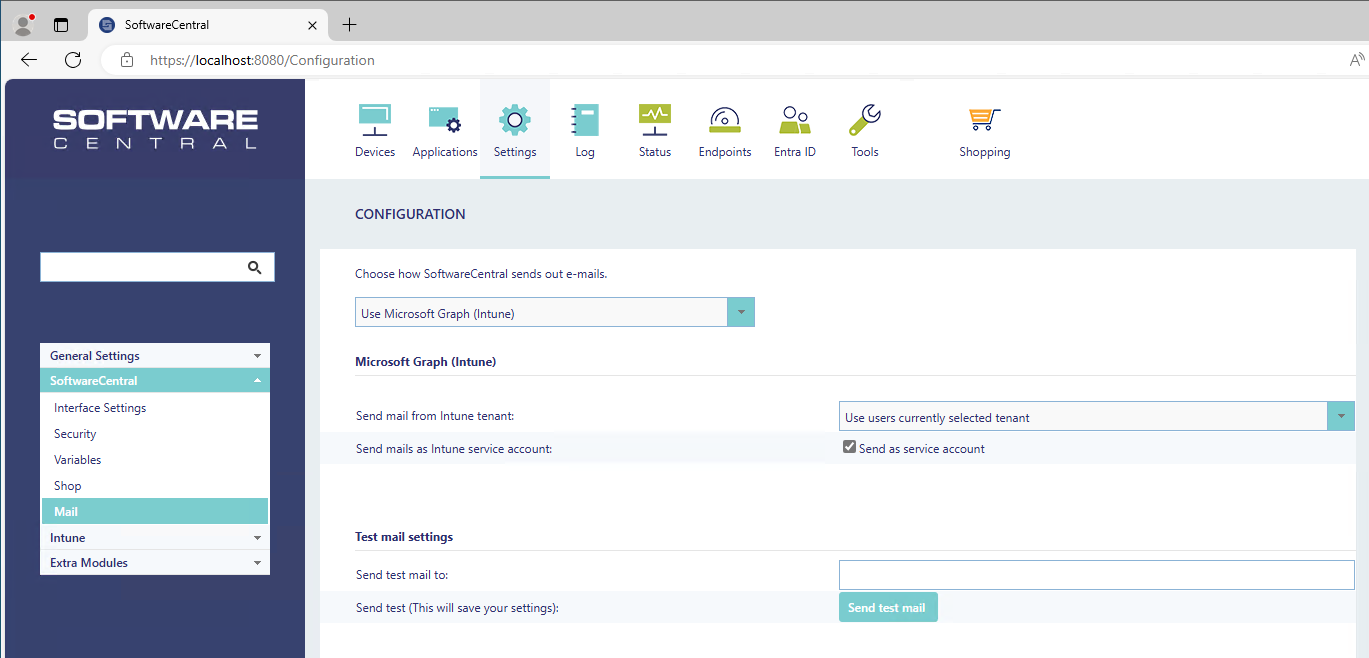
SoftwareCentral will send out mails to notify users about various things, such as order confirmations and orders pending approval.
To send out mails, you must configure the mail settings in SoftwareCentral.
This is also done from the Configuration page.
In the left menu, go to "SoftwareCentral -> Mail".
By default, SoftwareCentral will send mails via Microsoft Graph (Intune). With the default configuration, you must add a service account for the Intune tenant (see the step above).
Note that the service account must have an active mail box.
You can also configure your own SMTP server. The other mail options are covered in the Settings section of the manual.
You can test the mail settings using the "Send test mail" button.
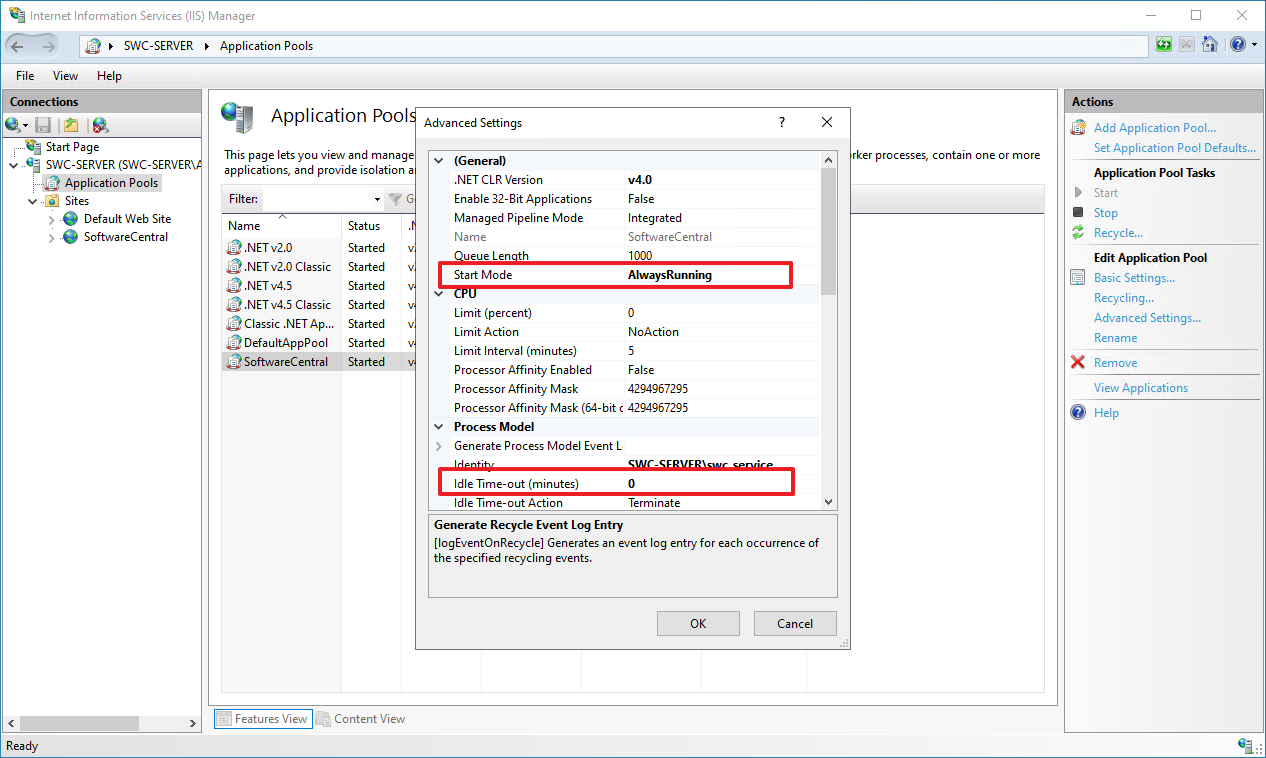
SoftwareCentral is installed with some default values on IIS server.
You can improve the performance (loading speed) of SoftwareCentral with the following advanced settings.
|
Note that this will significantly increase the memory usage of SoftwareCentral. |
On the application pool, change the start mode to "AlwaysRunning".
Set Idle Time-out (minutes) to "0".
You may additionally extend or disable the application pool recycling, although this is not recommended.
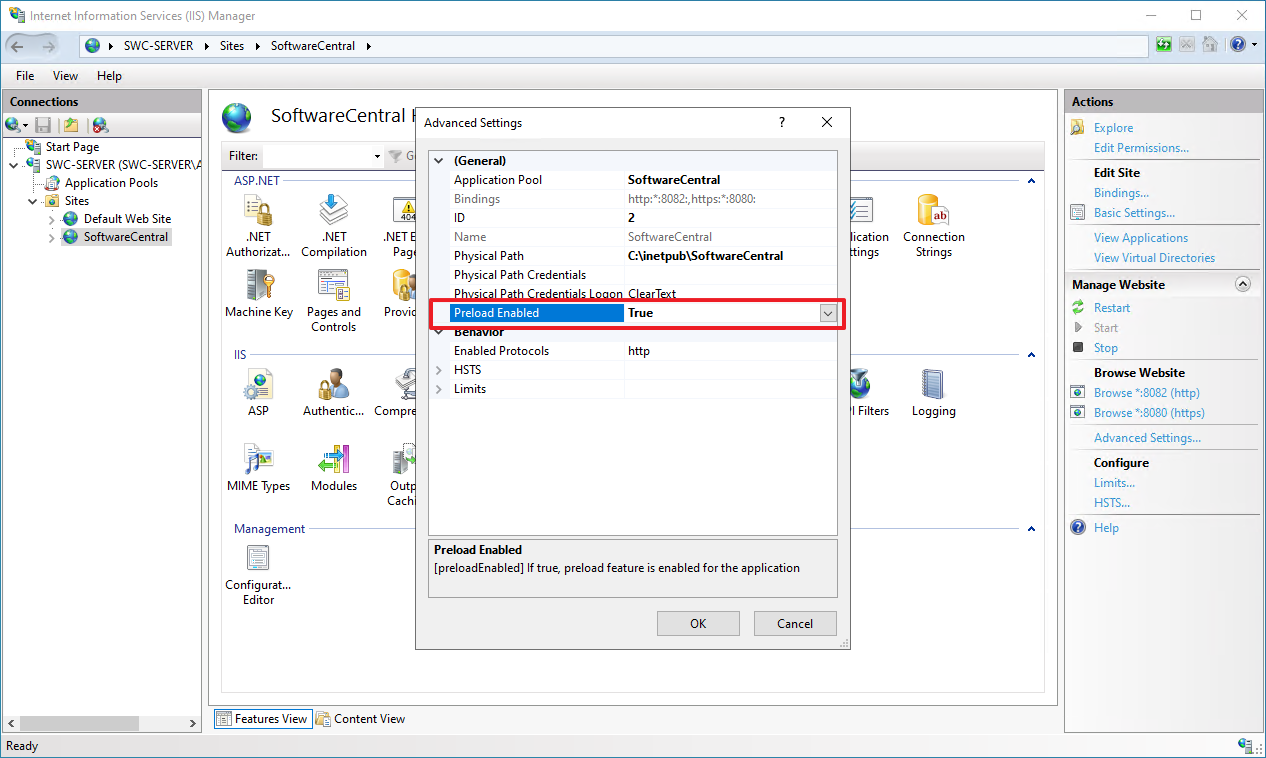
On the site, under "Advanced Settings", change "Preload Enabled" to "True":
Now the basic configuration of SoftwareCentral is complete, you can set up remote access to SoftwareCentral, so users can access SoftwareCentral from their own browsers.
Follow the instructions here Set up hostname to setup a hostname with a SSL certificate.
You are now ready to use SoftwareCentral.
You can read the Getting Started manual to help you get started with SoftwareCentral.